MetaBuddy for Unity Documentation
Table of Contents
- Requirements
- Features
- Installation and Quick Start
- Roadmap
- Errors that MetaBuddy catches
- Configuration
- Command Line Usage
- FAQ and Troubleshooting
- Prerequisites
- Support
Requirements
1. Unity Editor 2018.4 or newer, either Personal or Pro edition, running on Windows or macOS
2. A Unity Project stored in a git repository. Here’s how to add a project to git (uses GitHub).
3. Visible Meta Files enabled in your Unity Project.
- This is the default in modern versions of Unity so they are probably already enabled. If not, here’s how to enable them.
Features
- Finds meta file errors right from within the Unity Editor.
- Helps you catch meta file errors at source, before they propagate throughout your team.
- Works with any git client (eg. GitHub, GitLab, GitKraken, git command line).
- One-click user interface that everyone on your team can use.
- Context menu and help icons help you to fix errors quickly.
- Adaptive user interface works with Light (Personal) and Dark (Pro) editor skins.
Installation and Quick Start
1. Download the Asset
MetaBuddy is provided as a Unity Asset. Head over to the Unity Asset Store to download it.
2. Import MetaBuddy into your project
Unity 2020.1 or newer
- Go to Window > Package Manager.
- Select Packages: My Assets from the dropdown list.
- Click on MetaBuddy, then click the Import button at the bottom right to import it into your project.
Unity 2019.4 or earlier
- Go to Window > Asset Store.
- Click the My Assets button at the top of the Asset Store window.
- Finally, click the Import button for the MetaBuddy Asset.
3. Open the MetaBuddy Window
Choose Window->MetaBuddy from the Unity Editor menu.
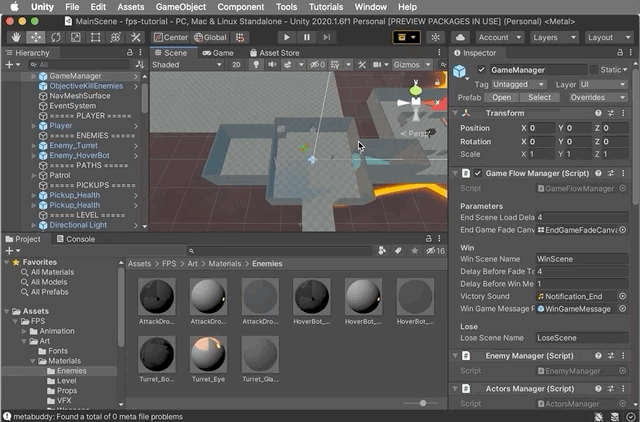
4. Dock MetaBuddy (optional)
This is down to personal preference, but we like to dock MetaBuddy as a tab beside Inspector. This means that it is always to hand, without getting in the way.
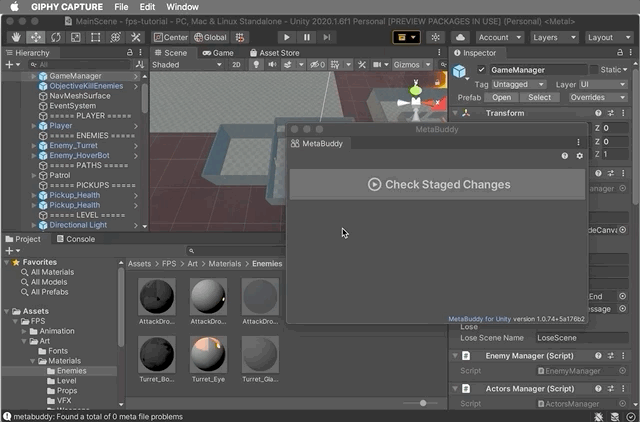
5. Stage your changes
Stage changes for commit using your usual git client.
MetaBuddy integrates directly with your project’s git repository. This means that it works with a wide range of git clients; git command line, GitHub for Unity, GitKraken etc.
6. Check your changes
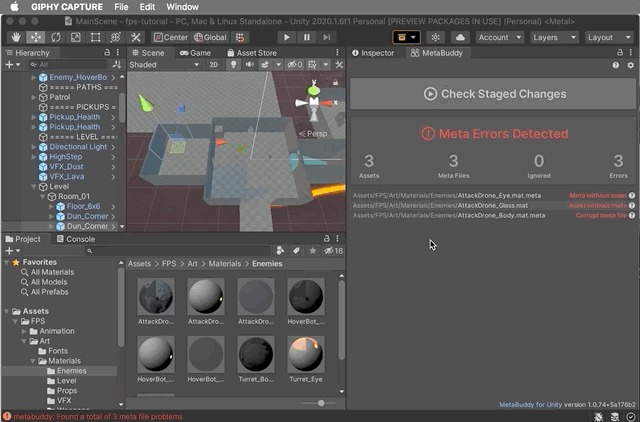
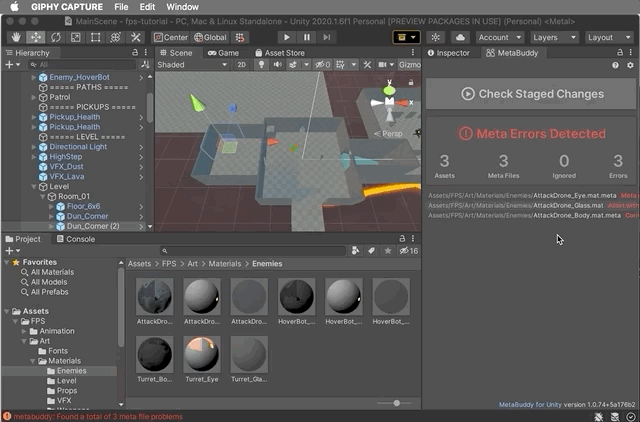
Click MetaBuddy’s Check Staged Changes button to check your staged changes for meta file problems.
If the check came back with No Meta Errors, then congratulations, you are good to commit your changes using your usual git client, confident that you aren’t introducing meta file problems that might impact your team.
If MetaBuddy found meta file errors in your staged changes, it will come back with Meta Errors Detected followed by a list of the individual errors that it found.
If you see an error message rather than No Meta Errors or Meta Errors Detected, check out the Troubleshooting section below for help on how to fix it.
6. Fix any errors
You can get a suggestion for how to fix each error by hovering the cursor over the red error description.
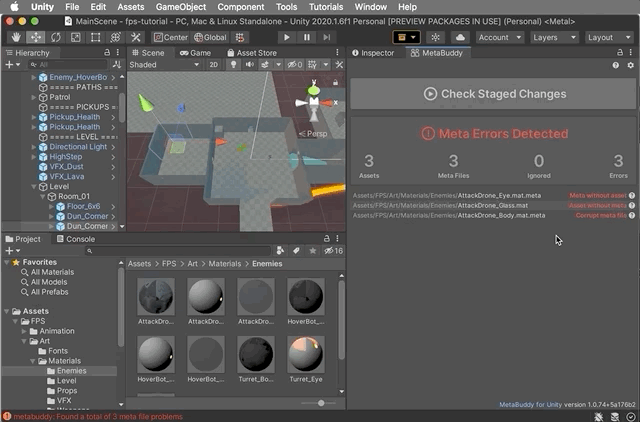
The right-click context menu for each error lets you copy the affected file’s path to the clipboard, or reveal it Finder/Explorer for closer inspection.
7. Pro-tip: Click the help icon (?) to the right of each error for:
- More detail on the error.
- Common causes of the error.
- How to fix it.
- How to avoid the error in the future.
Follow the instructions to fix all of the errors, re-checking with MetaBuddy as you go until you see No Meta Errors.
Roadmap
We’re continually working to extend and improve MetaBuddy.
Check out the backlog in GitHub to see what we’re planning for future releases.
Want to vote-up a feature? Or got an idea for a new one? Don’t be shy, raise an issue or drop us a line.
Errors that MetaBuddy catches
MetaBuddy catches various meta file problems that developers run into when storing Unity projects in git.
Most of these problems arise through human errors, mistakes that developers make when committing their work to git.
This page gives a comprehensive list of the individual errors that MetaBuddy detects along with instructions for fixing and avoiding them in future.
Configuration
MetaBuddy’s configuration options are in the Unity Project Settings window at Edit->Project Settings->MetaBuddy
This page explains each of the configuration options available.
Command Line Usage
You can instruct Unity to run MetaBuddy from the command line builds.
This can be useful if you want to run MetaBuddy as part of an unattended build process, for instance as part of a Continuous Integration (CI) job on your build server.
Starting MetaBuddy from the command line
To run a MetaBuddy check from the command line, use Unity’s -executeMethod command line option like this:
Unity -projectPath <YourProject> -executeMethod MetaBuddy.CLI.Run
When MetaBuddy is started from the command line in this way, it exits Unity as soon as it has finished checking your project. It signals the success or failure of the checking process through the return code returned by Unity.
You can arrange for your CI system to fail any build containing meta file errors by inspecting this return code.
A code of 0 will be returned if no meta file errors were found. If one or more errors was found during checking, a non-zero error code will be returned.
Command line options
A selection of the configuration options available through MetaBuddy’s Unity Project Settings page can also be specified on the command line like this:
Unity -projectPath <YourProject> -executeMethod MetaBuddy.CLI.Run -mb-config config-for-ci.yml -mb-verbose
In the above example, we tell MetaBuddy tell to load its configuration from a file named config-for-ci.yml instead of the default .metabuddy.yml We also specify that MetaBuddy should log verbosely to the Unity log file.
Options specified on the command line override those loaded from the configuration file. You can use the verbose logging option -mb-verbose to have MetaBuddy print all of its configuration options to the log before checking commences.
FAQ and Troubleshooting
No staged changes for MetaBuddy to check
When you see this message everything is working fine, but there’s nothing for MetaBuddy to do yet.
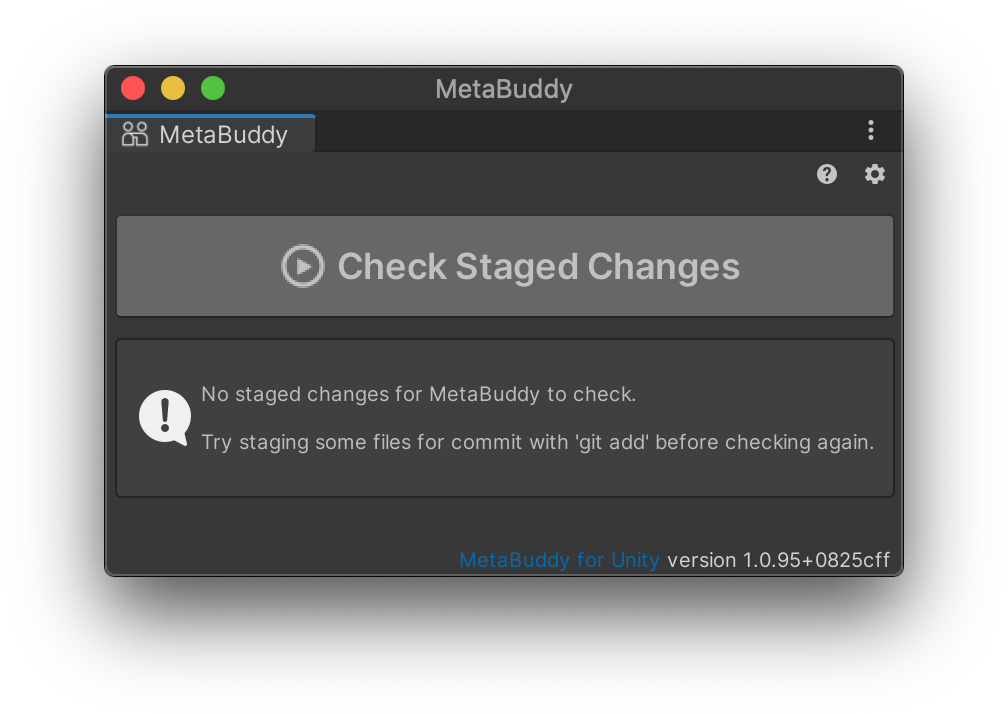
MetaBuddy checks the changes that will be included in your next commit to git. Git calls these staged changes.
By checking only staged changes, MetaBuddy ensures that each individual commit that you make to git is complete and correct, without bothering you with false warnings for files that you aren’t intending to commit.
As soon as you stage some files with git add or your favorite git client, MetaBuddy will pick them up and this message will disappear.
MetaBuddy can’t find the git repository for this project
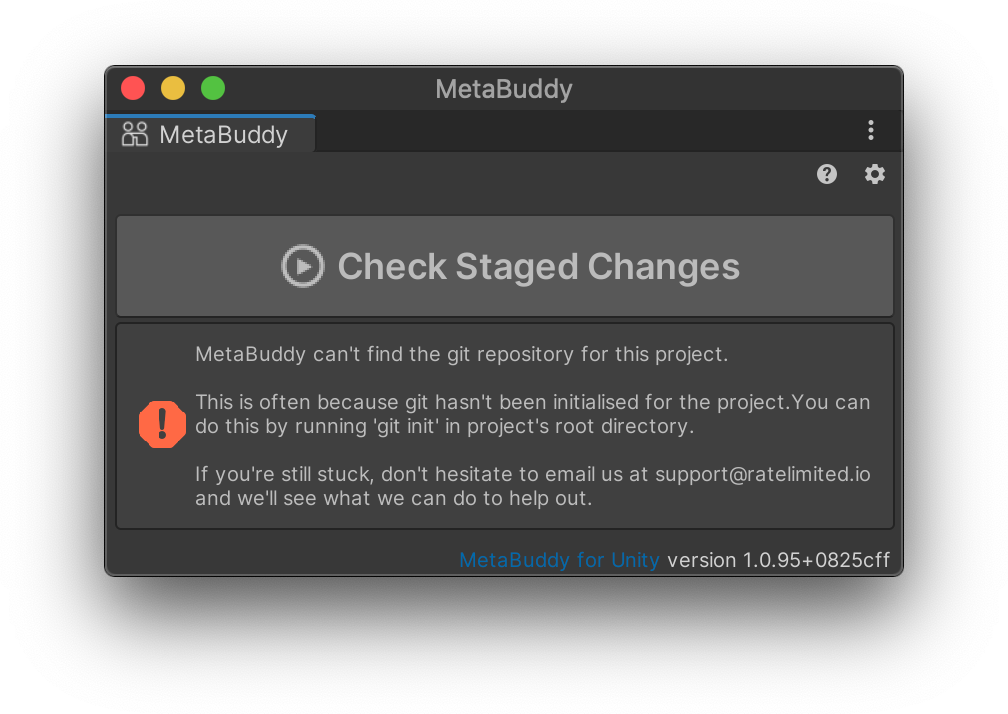
When you see this, it almost always means that your project isn’t in a git repository yet.
The most basic way to setup a repository is to run git init from your project’s root directory. But, there’s a little bit more to do in order to get git working smoothly with Unity.
You can find a step-by-step guide to setting up a git repository for your project here.
How does MetaBuddy find my project’s git repository?
MetaBuddy finds your project’s repository by searching for a folder named .git in the root of your project. The .git folder is where git stores all of its version control information.
If MetaBuddy doesn’t find a .git directory in the root of your project, it searches each of the directories above your project in turn.
This is useful for cases where your Unity project isn’t in the root of your repository. For instance, when you have several Unity projects alongside each other within the same git repository.
macOS tells me that “git2-6777db8.bundle can’t be opened because it was not downloaded from the App Store”?
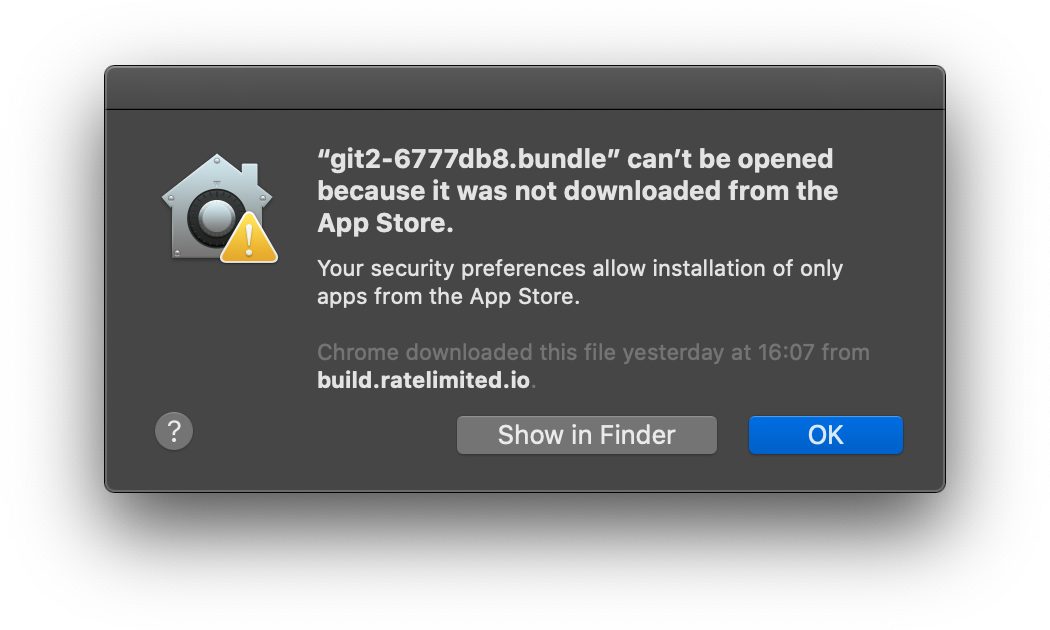
This is caused by the GateKeeper feature in macOS which checks that all applications have been downloaded from the Apple App Store or have been signed by a Certified Apple Developer and notarized by Apple.
It doesn’t make much sense to distribute a Unity Asset like MetaBuddy through the Apple App Store, so MetaBuddy uses the second option of having its code signed and notarized by Apple.
If you see this message it usually means that you have GateKeeper set to super-strict mode where only applications from the Apple App Store are allowed. There are two ways you can fix this.
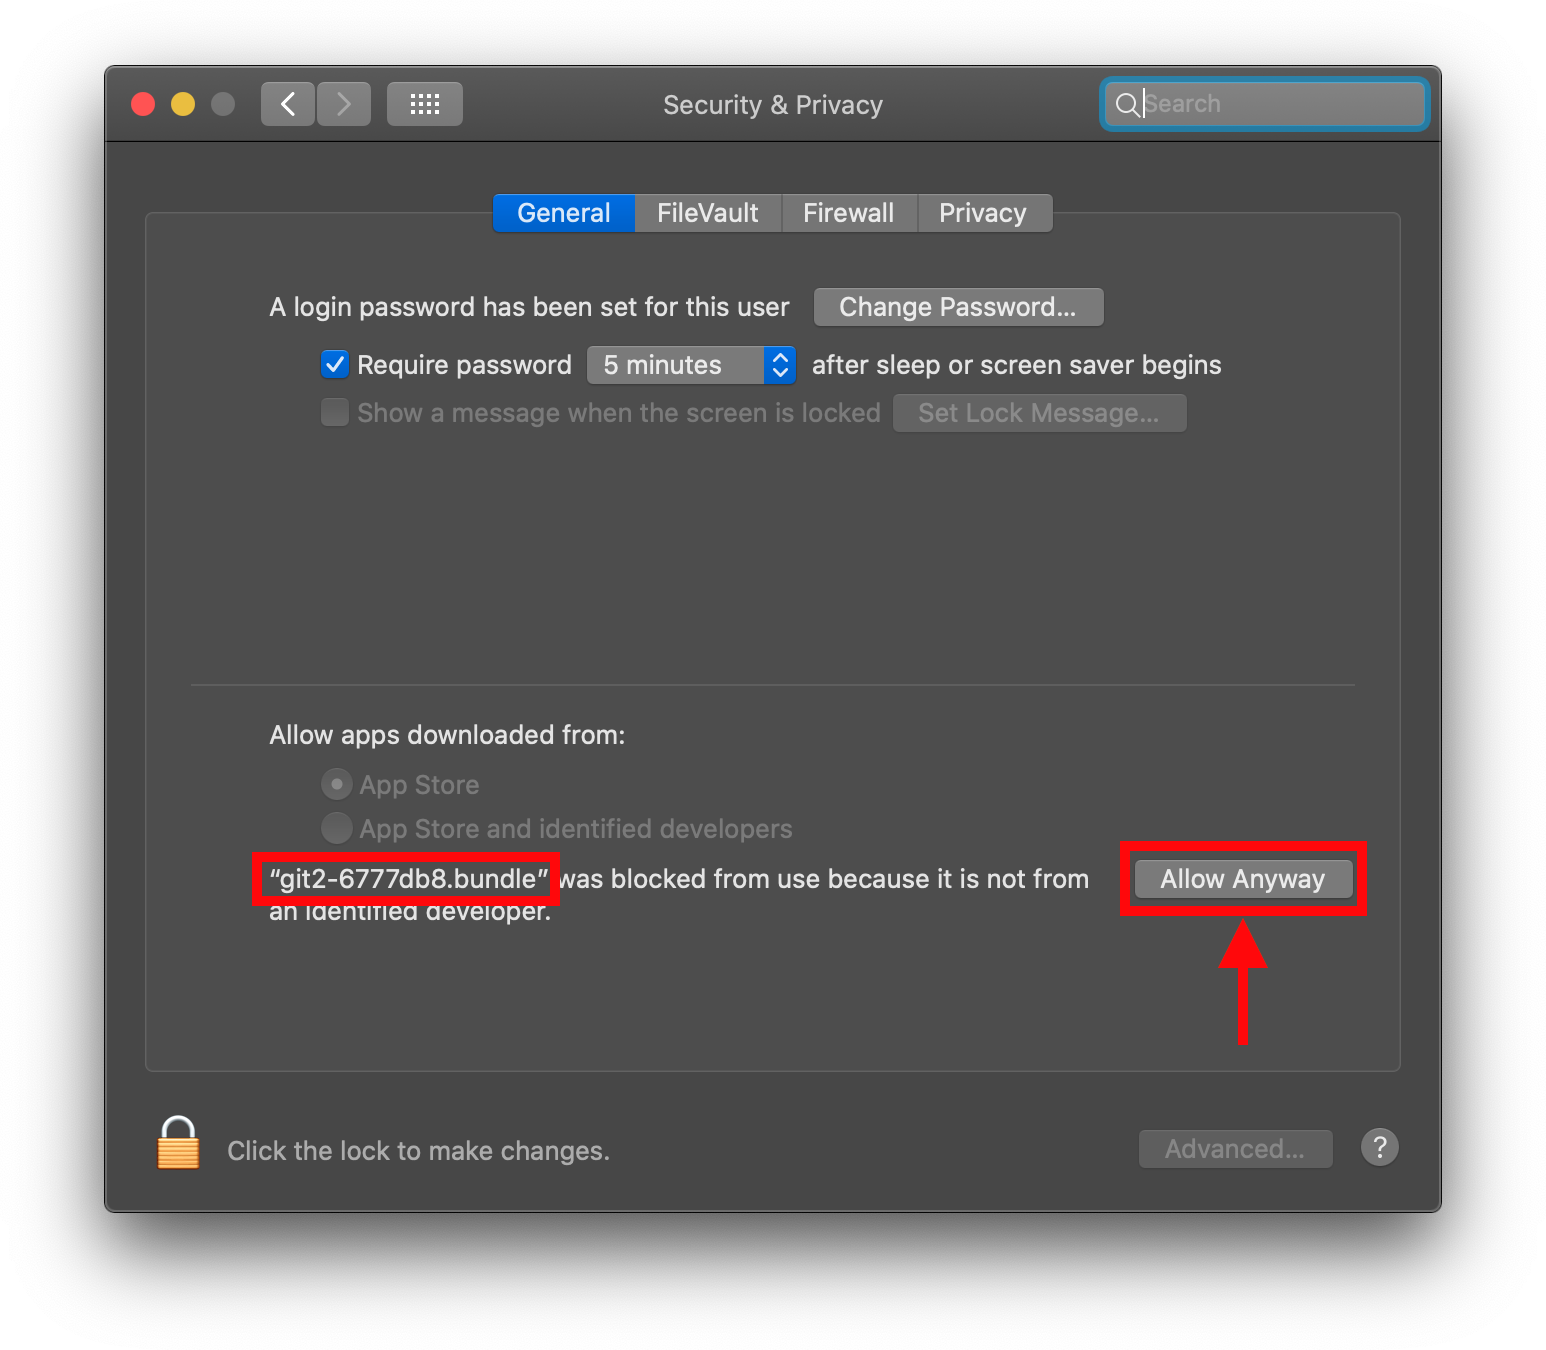
Option 1. Create a one-off exception for MetaBuddy
- Choose System Preferences from the Apple Menu.
- Click the Security & Privacy icon.
- Choose the General tab.
- You will see a message telling you that git2-6777db8.bundle came from an unidentified developer.
- Click the Allow Anyway button to the right of the message.
- Restart Unity and reopen your project.
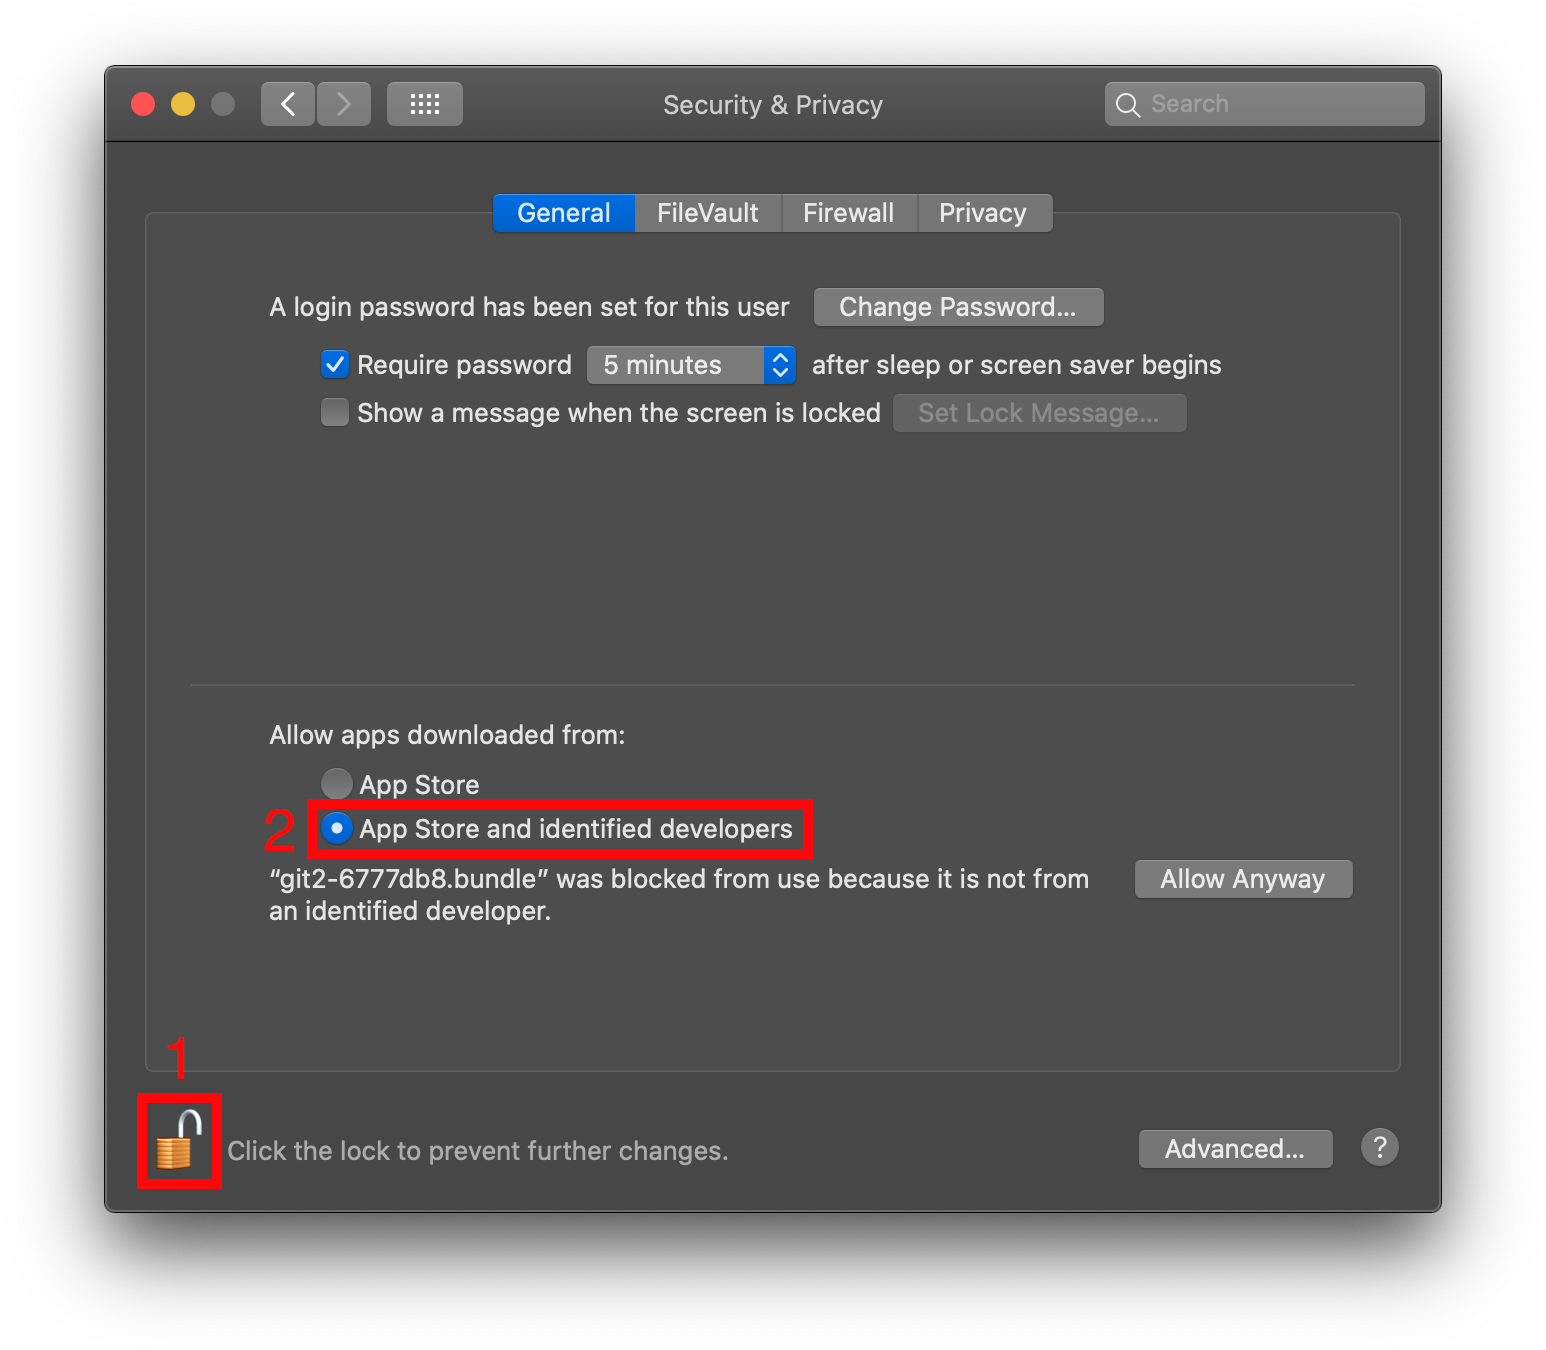
Option 2. Allow applications from identified developers (even if they didn’t come from the Apple App Store)
- Choose System Preferences from the Apple Menu.
- Click the Security & Privacy icon.
- Choose the General tab.
- Click the Padlock icon in the bottom left of the window.
- Enter your password when prompted.
- Select the App Store and identified developers option.
- Restart Unity and reopen your project.
Support
Got questions? Need help?
- Drop us an email at support@ratelimited.io
- Raise an issue in our GitHub repository.
- Fill in our Contact Form
- Chat to our team on the MetaBuddy Discord Server